

I hope that the Easter bunny is good to you!
To see how we made these marbled eggs using nail polish, check out this blog – Camille Styles
I hope that the Easter bunny is good to you!
To see how we made these marbled eggs using nail polish, check out this blog – Camille Styles
 When I discovered this cute square tray at Homsense on clearance for $8, it of course had to come home with me. It has been the center piece on our dining room table for awhile now, but I felt it was missing something.
 I decided to cut down a piece of 12″x12″ patterned heavy card stock and set it in the bottom of the tray. This literally took me 30 seconds and voila, just that touch of colour needed. With tons of options in paper and it’s cost being minimal, it can be changed regularly.
 and the cute little birds help too – thank you Rosa over at FlutterFlutter!
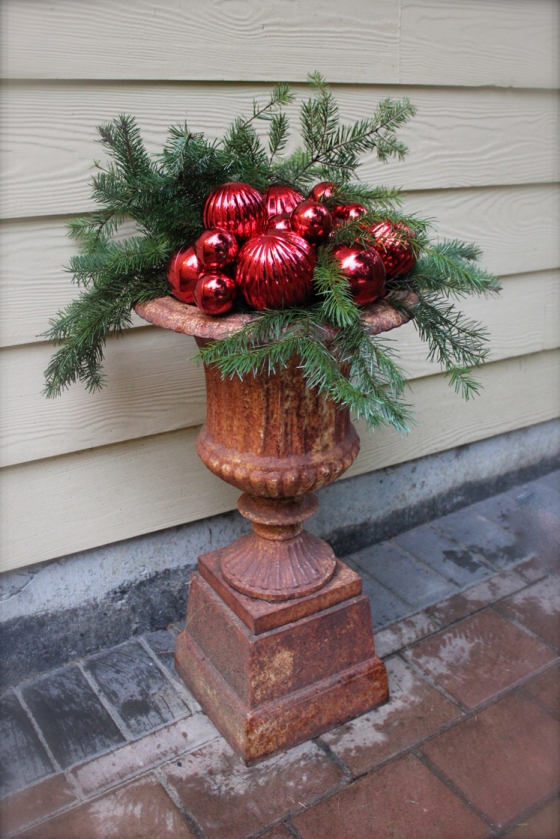
It is that time of year when really not too much grows, and spending money on the things that will, isn’t really a priority. Yet it is nice to get the front entrance into the holiday spirit. This little project literally took me 15 minutes and cost next to nothing.
 Simply use any planters or pots that you already have.
Collect ornaments in various sizes, and colours if you want – this year I had a bunch of red ornaments that we did not use on the tree. I have found in the previous years that ornaments that have glitter or other coatings don’t do as well if they are out in the direct rain.
10″ wooden skewers
 Insert the wooden skewers into the end of the ornament (Don’t take off the little topper, that helps hold the skewer in place. It doesn’t matter if the skewer is in a bit crooked)
Insert into the dirt and arrange at different heights. ( I should have chopped off the grass before the picture was taken but oh well 🙂 ! )
Then I collected some pine branches and placed them around the ornaments. If you don’t have access to pine branches, you can buy bunches at most nurseries, boutique grocery stores and I have even seen them at Home Depot!

 and there you have it, probably one of the easiest things you will do all Christmas!
What a fun night and a great way to get into the Holiday Spirit. A Happy Holi-DIY hosted by Poppytalk & Anthropologie. We spent an hour learning how to make cute Origami paper lanterns & ornaments.
 We had great teachers in Jan & Earl of Poppytalk

We enjoyed yummy treats from Beaucoup Bakery & Cafe, that were so good I forgot to take a picture before I ate them…but loved their business card, so I thought I would share.

It was great to share the evening with my dear friend Rosa

I seemed to spend a lot of time taking pictures of this Bowery Lane Bike in Anthropologie

and when I got home my kidlets were eagerly waiting for me at the window (yes it was way past their bedtime, but it is all good!) They loved the lanterns lit up.
 So the kids and I are going to finish the strand of lights with the instructions that I was sent home with. I am thinking some cute red and white paper, or paper with stars on it……
Again, a big thank you to Poppytalk and Anthropologie for a great evening!
Sometimes putting together goodie bags can be a challenge. Balancing something of quality without breaking the bank.
Here is an easy, simple option, big carnival lollipops with personalized tags.

Customize you tags with whatever information you want and print on heavy card stock.
So as not to confuse, these are re-creations. I did not take pictures when I first made these for the boys birthday, that is why this time there is a tag for each kid. Will have to put on the thinking cap for when Chloé actually turns 4!

 Cut out the tags and hole punch.

Tie a ribbon and attach the tag.
 And send every kid home with a sugar rush!

I bought these in a warehouse pack from HyLouie, and I have also seen them at Costco. Add some white card stock, a colour printer, ribbon in any colour and you are set!
Quite awhile back, I found this metal filing cabinet sitting at the side of the road. I think I drove past it twice and told myself if it was still there when I got back, then it was meant to come home with me. Well it was still there, so thank goodness for pick-up trucks, and a hubby willing to do a bit of heavy lifting.
This was the second project that I tackled while the kids were away. It was a little more involved, so thank goodness that Al got right in there with me. He willingly dove into all the little important details that required patience, like peeling and sanding all the stickers off.
Here was our little gem before –

I decided that this was the perfect cabinet for art supplies and such, so I wanted something fun, and a little quirky. Not only are Blue, Yellow and Pink the kids favorite colours (the coloured drawers are just for them, and now filled with all sorts of treasures) some of the base colours in design are Cyan, Magenta, and Yellow! I also could not resist a little bit of distressing!

As with any project, it always seems to snowball into something else. I am now working on getting the laundry room/art room painted and set up. All for another day, until then…..here is how I completed the Filing Cabinet


I am loving the new found space and the fact that everything has a place!
So Chloé came home from her little summer camp today with the information that tomorrow was alien dress up day. Tomorrow!!?? and aliens! Yikes was my first thought. How in the world was I going to pull that off? Had it been princess dress up day, no problem, but little green men….So off to the dollar store we headed. I was hoping that I could take the easy way out and maybe find one of those headbands with the springs and sparkly balls. Well, that was not to be, and since it was already a crazy day, I worked with what I could find.

I found this little green felt frog hat, and a bag of mini pom pom’s. Purple was the colour of the day!

I then pulled out the handy glue gun, coloured straws and paper to make some ears.

Every Girl Alien has to have eyelashes!

Chloé added the red straw nose, and her Alien was complete.

The kids have been enjoying some quality time with Grandpa & Grandma these last few days, so I got started on a few projects that have been on the back burner for awhile now.
I have been wanting to make an “antique” name plate sign for our home since last summer, there was this bare spot on the wall that was begging for something to be hung there. I finally found the time (thanks mom and dad!!), and I am pretty pleased with the results.


If you have a good couple of hours this project can easily be done in that amount of time, with not a lot of supplies needed.
Materials You will need
10″x26″ Pine plank
Mighty Mouse Sander, or Sandpaper (medium grit)
Painter’s Touch White Spray Paint – Flat Coat
Template
Black Paint
Fine Tip Paintbrush
Painter’s Touch Clear Varnish – Satin Coat
Picture Hangers

Steps to completing your sign
I do not like free handing fonts as I am pretty picky when it comes to typography ( I can thank my great typography teachers for that!) So I go pretty old school when it comes to making the template and transferring it onto the board. I am sure that with technology today I am way behind, but, like the saying goes, if it ain’t broke, don’t fix it, and this is my tried and true way.


 One project down, next up….well that is for another day!
Hope everyone has a great Weekend!
